Miniature Photography: 34 Settings, Apps and the Golden Angle
Miniature photography focuses on capturing small-scale objects in a way that either emphasizes their miniature scale or makes them appear life-sized. Miniature figures are often highly detailed and well painted. This genre of photography relies on balancing focus and depth of field with well lit, still objects.
While there are advanced techniques like photo stacking and macro lenses, it is very possible to get a great image with a phone camera or DSLR.
The biggest factors that impact your shots are: Phone and Camera settings, stability, lighting, background and post processing.
I really like quick start guides with simple set ups. It gets you the basic information you need right away so I will start there, then go into more detail:
Best Camera and Phone Set Up For a Miniature Photo Shoot
Quick Start Phone Set Up for Miniature Photographers
Settings: Manual Mode > ISO 100 – Aperture F5 – Shutter Speed 200 (Use an app like ProCam 8 or Pro Camera by Moment for iPhone, ProCam X – Lite or Open Camera for Android to access these settings if you can’t with your camera app). Tap the screen to focus on the miniature where you want it centered.
Background: The simplest backdrop is a light box with black pvc paper behind it in an arch. (I have this one but you can get a smaller size). You don’t need the lightbox necessarily, you can simply arch the background paper on a small stand (I use my lamp and some tape).
Lighting: A small set of LED Camera Lighting will work fine. I use these bigger soft lights only because I have them already. I will say the big soft light they produce are amazing. They take up a lot of space though.
Stability: I went with the Amazon tripod and if you need a phone mount. Use a remote or a timer to actually take your shots if you can. It helps with stability.
Camera Distance: I set up my tripod roughly 2 – 2.5 feet from the miniature.
Post Processing: This is highly dependent on what you need. Black background, background remover, cropping, filters, color balance and more. Check the post processing section for all my suggestions and what I use.
That should cover the basics for a phone set up. DSLR is very similar, let’s do that next:
Quick Start DSLR Camera Set Up for Miniature Photographers
Settings: Manual Mode > ISO 125 – Aperture F4 – Shutter Speed 200. Very similar starting point here, and then adjust as needed. Aperture is the setting you’ll play with to get more of the miniature in focus. You should manually pick the focal point of the shot: Tap the screen to focus on the miniature where you want it centered.
Background: Same set up as the phone. Light box with black pvc paper behind it in an arch. (I have this one). You don’t need the lightbox necessarily, you can simply arch the background paper on a small stand (I use my lamp and some tape).
Lighting: Here again the small LED Camera Lighting will work if you have room on your desk to set them up. I use these bigger soft lights and I really love them. They take up a lot of space though.
Stability: I use a simple Amazon tripod. Use a remote or a timer to actually take your shots if you can. It helps with stability.
Camera Distance: I set up my tripod roughly 2 – 2.5 feet from the miniature.
Post Processing: This is highly dependent on what you need. Black background, background remover, cropping, filters, color balance and more. Check the post processing section for all my suggestions and what I use.
That should be enough to get you started in the miniature world of photography.
Next up we will get into more depth. I’ll cover auto and manual settings and what these settings are doing so you know what to adjust.
First, let’s cover the angle to shoot your miniature from:
The Golden Angle of Shooting Miniature Photography
The Golden Angle is the perspective that gives you the best view of the model. It captures all the best features of your miniature. For characters that is typically a front view showing his or her face.
You’ll also want to position the characters weapons or any items they are carrying in a way that shows well in the photograph. Any prop you use should be positioned after you set up the main characters angle. Set the scene around showcasing the primary model.
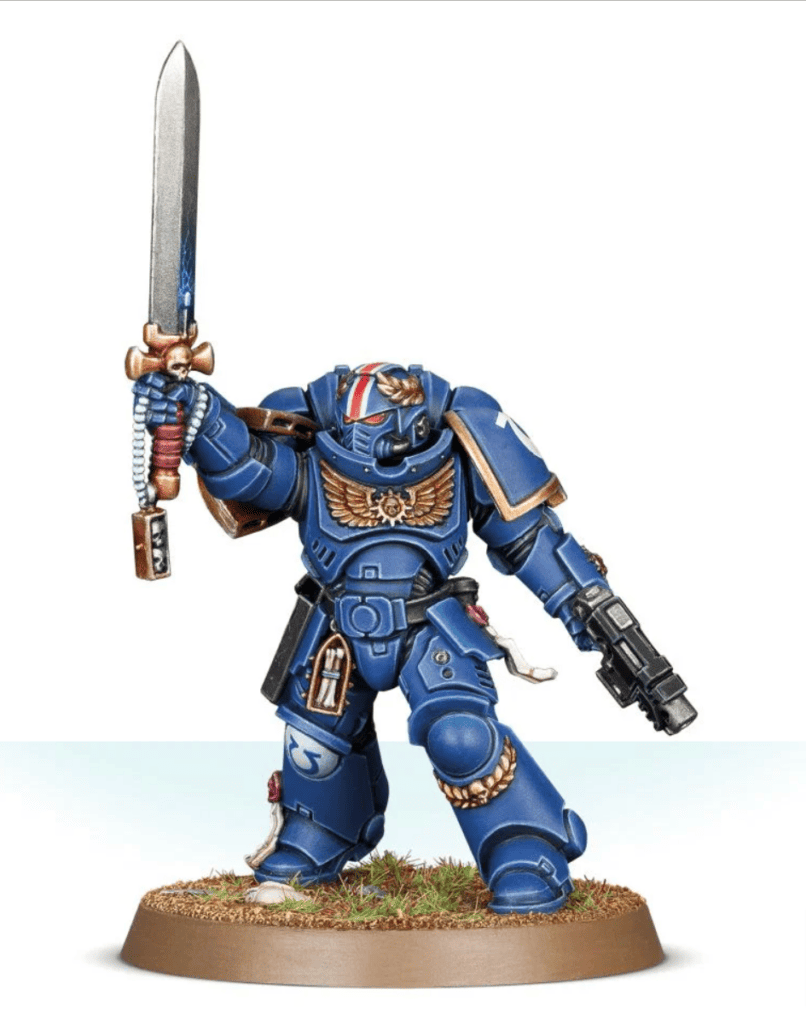
If you are a fan of Warhammer, every box art image is taken from what Games Workshop believes is the Golden Angle. You can see it on the box you bought, or go to GW’s site and see how they show their models. For example:
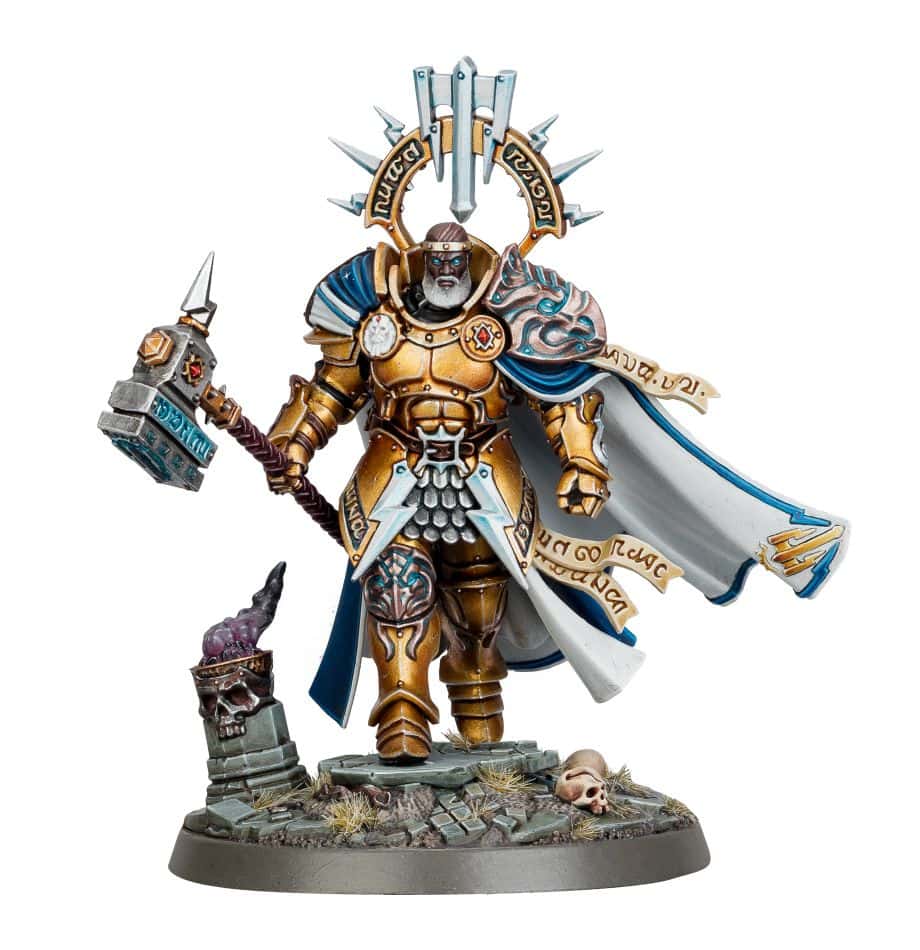
You can see Lord Commander Bastian is face forward. You can see his weapon clearly, including the detail on it. You get the full effect of his flowing cape.
This then, is his Golden Angle. Had he been holding a different weapon in a different pose, the angle might change. For example:
Here you can the Lieutenant has chest face forward, his sword on an angle so you can see details, and he is facing to the side rather than looking at the camera.
With that covered, we can get into the details of phone and camera settings so you know what adjustments you might need to make.
Detailed Phone and Camera Settings for Miniature Photography
In this section I’ll cover the important phone and DSLR settings. Then we can talk more in depth about a good set up for your shots in terms of background and lighting.
I’ll also cover stability and distance. Finally I’ll give you a list of apps and sites to help you with post processing to really clean up and focus your images.
Here we go!
The Most Important Basic Smartphone Settings for Miniature Photography
Ok first up let’s cover your phone settings. I use my phone a lot for miniature painting, either recording my WIP’s (work in progress) or documenting my steps, or just a quick shot. Some of my best pictures are with a simple phone shot.
There are some important settings to go over, and then we’ll do some general tips for good shots. Finally I’m going to cover what you can do with apps in post processing. There are ways to remove backgrounds, get a pure black or white background, clear up some dust in the images, and more.
Ok on to the basic settings for your phone:
- Resolution: Always set your camera to the highest resolution possible. Seems obvious but some people set it lower to save room on their phone.
- Focus: Most smartphones offer tap-to-focus. Open your Camera app, tap the screen to show the auto focus area and exposure settings. Tap where you want to move the focus. Sometimes it’s the center of the miniature, sometimes the face, or maybe some feature you’re looking to accentuate.
- Exposure: Many smartphones allow you to adjust exposure by tapping and sliding your finger up or down on the screen. Use this to avoid overexposed (too bright) or underexposed (too dark) photos.
- White Balance: If your images looks too yellow or blue, and if your phone allows, manually set the white balance to match your lighting conditions. Meaning if your lighting makes the white on your miniature look more yellow or blue, white balance can account for that. It may auto adjust but if not try manual mode.
- HDR Mode: High Dynamic Range (HDR) helps you catch the most contrast possible. When painting miniatures, one of the bigger goals is to achieve great contrast. So it makes sense to try to capture it as well as you can in your images.
Advanced Phone Settings and Apps to Help Take Pictures of Miniatures :
Advanced settings can be unlocked with 3rd party free or paid apps if you don’t have access to them on your native camera app.
iPhone: For iPhones I have two 3rd party apps to recommend: ProCam 8 or Pro Camera by Moment
Android: Android users like me (aka cool people) can use ProCam X – Lite or Open Camera
The three settings we are concerned with are: ISO, Aperture (F-Stop), and Shutter Speed.
ISO: measures the sensitivity of a camera’s sensor to light, with higher values allowing for better performance in low-light conditions but potentially introducing more noise or graininess. I typically set this to either it’s lowest setting (usually 100) or 200 at the most.
Aperture: Also known as F-Stop, refers to the size of the opening in the camera lens that allows light to pass through, affecting both the image’s exposure and depth of field. Depth of field is how far back it can focus. It varies with model sizes so feel free to play with this setting based on what you see in the viewfinder or in images.
Shutter Speed: controls the duration for which the camera’s sensor is exposed to light, influencing both the image’s exposure and the ability to freeze or blur motion. We don’t care about motion blur as our miniatures are still.
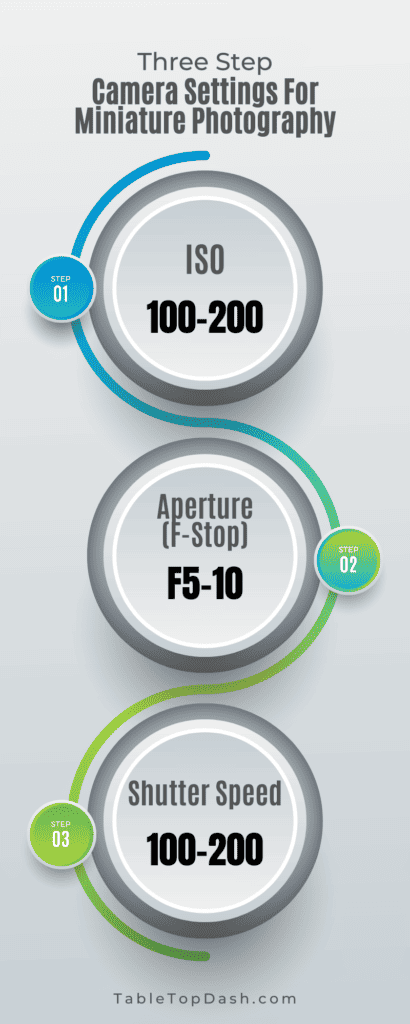
A simple 3 Step setting guide for the settings:
- Set your ISO between 100 and 200. Typically we like this to be very low as the images are less grainy, but also a bit darker. We can compensate for that though with the other settings.
- Set the Aperture (or F-Stop) to between F5 and F10. Sometimes you’ll have to go higher if you have a larger model. What you’re concerned with here is depth of field, how deep does the camera focus on the miniature. Is only the front in focus? Raise the aperture.
- Set the Shutter Speed to between 100 and 200. Shutter speed regulates how long the shutter opens. A longer open time allows for more light to come in. It will also blur motion but since our Warhammer figure isn’t going anywhere it’s not a problem.
My default settings are: ISO 100 Aperture F5 and Shutter Speed 200
Depending on how that looks in the viewfinder, I’ll adjust accordingly and take a shot to see how it looks. So, here’s a nice graphic for you on my 3 Step settings for Miniature Photography:
With these three simple settings you don’t need to be a professional photographer to get a great shot. I would also recommend checking out the section here on background and lighting. A good backdrop, a lamp or led light, maybe even a light box, and you’re off to a great start.
Next up, the pro shots with a DSLR
DSLR Settings That Will Give You Better Results
The smartphone shots are awesome because it’s so easy to get a quick picture. When you want an amazing shot though, you have a better chance with the DSLR. Let’s get into these settings. If you already read the phone settings, this will seem familiar but forgive me if I repeat myself. Some people skip to the section they want the most.
- Manual Mode: Switch your camera to manual mode to have full control over aperture, shutter speed, and ISO settings. As with the phone, these are the 3 settings we are most concerned with.
- Aperture: You will likely see this as F-Stop format. So you might see either F/2, F/3, F/4 etc, OR F2, F3, F4 etc. With or without a slash. The other big thing to know is LARGER numbers are SMALLER openings (Apertures), and SMALL numbers are LARGE openings. So when I say a smaller aperture gets more depth of field in focus, know that I mean increase the F Stop number til you get the depth you want. Just know that a very small aperture (high F Stop number) might start to make the image lose some sharpness.
Bottom line here is, start with F4 or so, and increase the F-Stop if needed to get more of the miniature in focus. - Shutter Speed: Shutter speed is how long the shutter stays open before it closes again. The longer it’s open the more light it allows in. Longer open time also leads to motion blur for moving objects. If you’re taking a miniature photo, we’re not very worried about motion blur. We can use a relatively long shutter speed to let in more light.
- ISO: Keep the ISO as low as possible to minimize a grainy look in the image. If you’re intentionally doing a low light image, it’s worth trying higher ISO. Just know the higher ISO might make the image a bit choppy.
- Focus: Use manual focus for precise control, especially when dealing with shallow depth of field. It’s typically a tap on the viewfinder to position the focus where you want it. Just simply adjusting the focus will allow the camera and lens to adjust and take better pictures.
- Depth of Field: depth of field refers to the range within the photo that appears sharp and in focus. So you might see just the front of miniatures in focus and then then anything behind starts to blur. This can be useful creative photography. A lot of times I love that blur look. You can focus on your miniature figures face for example, or a sword he’s holding up.
It’s fun to play with depth of field and see what others have done for some miniature photography ideas to play with.
Stability, Lighting and Background Tips to Take Better Miniature Photos
Tips for Easy Phone and Camera Stability
Stability: Even the slightest movement can result in a blurry photo, especially in low light conditions. Using a tripod or stand can absolutely improve the sharpness of your photos.
Tabletop Tripods: These are small, portable tripods that sit on your desk. While they do work and I do have a couple, I personally like the full size tripods.
I have trouble getting a backdrop, lights, miniature and camera all on the desk at the same time.
DIY Stands: If you don’t have a tripod, you can improvise. A stack of books or an amazon box can hold up the phone or camera just fine.
Remote Shutter: Use a timer or a remote to take shots without touching the phone, this eliminates any camera shake from touching the phone or camera.
Tips for the Perfect Lighting in your Miniature Studio
Lighting: Lighting is enormously important. Second only to the camera itself. I would put some effort into lighting your miniatures properly if you want good shots.
Use soft, diffused lighting to minimize harsh shadows and highlights. You can even use a white sheet of paper or a tissue to diffuse natural or artificial light.
- Softbox Lights: These are specialized lighting made to provide diffused, even light. Soft light allows you to capture the details in your miniatures without harsh shadows.
- LED Ring Lights: I have a ring light and often use it as a broad even light. I supplement that with my softbox lights from the sides.
- Natural Light: If you’re near a window or want to shoot outside, you can absolutely use natural sunlight.
Tips for Great Backgrounds and Framing for Photographing Miniatures
- Backgrounds: Light backgrounds, such as white or pastels, can make your miniature stand out and are excellent for showcasing bright colors and intricate details. However, they may wash out lighter-colored miniatures.
Dark backgrounds are my default background. Black specifically, if well lit, looks fantastic. Black or deep blues can add drama and make colors pop, but they may overshadow darker miniatures.
Black and White backgrounds are easy for apps to remove fully from the shot, giving you the miniature itself in isolation and you can put it on any background you want.
Mixed backgrounds, featuring gradients or patterns, can add depth and context but should be used carefully to avoid distracting from the miniature itself.
The key is to choose a background that complements the color scheme and theme of your miniature without overpowering it. - Rule of Thirds: The Rule of Thirds is a fundamental principle in photography that also applies to miniature photography.
The concept is simple: divide the frame into nine equal rectangles, three across and three down.
The Rule of Thirds suggests that placing your subject or key elements along those lines. So if you have a miniature and some background of say, mountains, you’d put the mini on one of the box lines and a mountain peak on another. - Angles and Perspective (Golden Angle): We covered the Golden Angle above. It’s the process of finding the angle that fully represents the miniatures features in the best way possible
A straight-on, eye-level shot can make the miniature appear as it would in real life, offering a natural perspective.
Low-angle shots, taken from below the miniature, can make it appear more imposing, adding a sense of drama.
High-angle shots, taken from above, can provide a comprehensive view, I like this for group shots. Warhammer armies or squads for example.
Experiment with different angles to find what best highlights the unique features of your miniature, and don’t hesitate to take multiple shots to help you decide. - Distance: I like to start with a distance of between 2 and 3 feet from my subject. I don’t know why that works for me, but it seems to get me the best results.
The ideal distance between the camera and the miniature will depend on your phone’s lens and focus capability.
Experiment to find the sweet spot. I like to take a shot that captures a lot of space around the mini and then just zoom and crop the image.
11 Sites and Apps for Basic Editing Options: Miniature Studio Post Production
Basic Editing: Basic photo editing involves cropping to frame your subject, adjusting brightness and contrast for clarity, and tweaking color balance for accurate hues.
Filters can add mood, while sharpening can bring out details. These quick changes can elevate your miniature photography and are accessible through various free or built-in software and apps.
Here are some options for free apps and sites that I like to use for post processing my images:
- GIMP (GNU Image Manipulation Program): This is a powerful, open-source photo editing software that offers a wide range of tools. It’s a good alternative to Adobe Photoshop for those who don’t want to invest in a premium service.
- Canva: While primarily a design tool, Canva offers some basic photo editing capabilities like cropping, applying filters, and adjusting brightness and contrast. It’s user-friendly and works in your web browser.
- Pixlr: This is another browser-based tool that offers both a simple editor (Pixlr X) for quick edits and a more advanced editor (Pixlr E) for those who want more control over their images.
- PhotoScape: This is a desktop application that provides a range of features including a photo editor, batch editor, and even a GIF maker. It’s easy to use and offers a variety of tools to enhance your photos.
- Snapseed: This is a mobile app developed by Google that offers a range of editing tools and filters. It’s intuitive to use and is great for quick edits on the go.
- Lightroom Mobile: Adobe offers a free version of Lightroom for mobile devices. While some features are locked behind a paywall, the free version offers a good range of basic editing tools.
- Instagram: While primarily a social media platform, Instagram offers some basic editing options and filters that can enhance your photos before you share them.
- Microsoft Photos: If you’re a Windows user, the built-in Photos app offers some basic editing options like cropping, rotating, and adjusting light and color.
- Apple Photos: For Mac and iPhone users, the built-in Photos app provides basic editing features like cropping, filters, and color adjustments.
- Remove Background: I personally use: https://www.remove.bg/ It’s simple and works well. You’ll get a background free image you can put on any background. Canva and other sites have background removers too.
- Black Background: For this I love: https://www.photoroom.com/tools/black-background It’s always worked smoothly and does just what you’d expect, a pure black background for your miniature.
Again you can do this in Canva and GIMP and others. - Photo Stacking: Photo stacking is a technique where multiple images of the same scene, taken at different focus distances, are combined into a single photo with enhanced depth of field.
This is especially useful in miniature photography to ensure that all details, from front to back, appear sharp and in focus.
The process is usually done through specialized software and is ideal for capturing intricate details in high resolution
Extra Equipment for Shooting Miniature Photography
Just to round this out because I had these same questions: “What else can I do to really optimize my miniature photography setup?” “Is just my stock phone good enough?” “Do I need a better DSLR lens?”
I will do in depth articles on this topic but let me say this: You can get great shots with a modern phone camera or DSLR. So no need to go overboard.
That said, yes there are improvements you can make. Here is a quick starting point for miniature or toy photography:
- Macro Lenses: These are the go-to lenses for miniature photography. They allow you to get close to the subject while maintaining focus, capturing minute details effectively.
The really good ones are pricey, but you can find cheaper options. Problem is they are cheaper for a reason. - Zoom Lenses with Macro Capabilities: Some third party zoom lenses offer a macro setting that can be useful for capturing miniatures, although they may not provide the same level of detail as a dedicated macro lens.
- Lens Attachments: If you’re using your smartphone, lens attachments can provide additional macro capabilities.
- My personal camera lens: My Sigma 30mm lens isn’t specifically for zoom or miniatures. It’s a more generalist lens and does a fantastic job. Of course it’s specifically for Sony, so look for your camera’s equivalent.