Wet Blending Acrylic Paint on Miniatures in 3 Easy Steps
What is Wet Blending in Miniature Painting?
What is Wet Blending? Wet blending is a painting technique used on miniatures to create smooth transitions between colors. It involves applying and mixing different paint colors while they are still wet. This method is popular for achieving realistic lighting effects, gradients, highlights and shadows on small-scale models.
Put simply, you are trying to get two colors to flow seamlessly into each other. For example let’s say we want to blend a red into an orange. The closer the colors are on a color wheel, the easier the blend.
We’ll begin with red on the left side, orange on the right.

If we want to wet blend this, we want both paints workable, and feather or work the transition between the two colors. So you’ll work your paint brush between them to blend it. The result we’re going for is a gradient like this:

A simple concept that can be challenging in execution. Just understand the goal is a transition between the colors as opposed to a hard edge.
Or at least give the appearance of a smooth transition. Up close the transition might look rough, but at the proper viewing distance it can all come together.
It’s important to understand a few things before trying to wet blend. The first is drying times. With oil based paints, blending is a common technique. Oils stay workable for hours before they dry and blending is more about technique than having to work quickly.
Acrylic paints dry quickly, this is usually a good thing for painters, but in this case it limits the time you have to work with it. So to wet blend acrylics you need to be sure to keep them workable. This can be done a few ways: Paint retarders, working quickly, using damp brushes.
The second point is the techniques, which I’ll go into below. Basically though you’re mixing, or blending, or dragging the colors together. There are also methods like glazing to smooth out your transitions.
Let’s get some terms defined:
Wet Blending Terms and Concepts:
Transitions
Transitions refer to the change from one color to another. So in the above Red/Orange example, both have transitions to the other color. The blended version we would say is a smooth transition. The side by side colors are more of a harsh transition.
In wet blending, you aim for seamless transitions so that colors flow naturally into each other without harsh lines. And again, it doesn’t need to be perfect. It’s a skill you can work on.
Transitions can be worked with a number of techniques including glazing, layering and wet blending.
Feathering
Feathering is a technique where you use a damp brush to soften or stretch the edges of a freshly applied color. So you start with a thicker application of paint, and use your brush in a zig zag pattern or dragging motion to stretch it out from the edge.
If you think about putting some butter on toast. You have the large tab of butter on one side, and you can smoothly spread it across. Where the butter is thick you can’t see under it, just the yellow butter color. Where it’s thin it sort of blends together with the brown of the toast underneath.
This helps in blending it smoothly into the adjacent color, making the transition less noticeable.
Blending
Blending is simply the act of mixing two or more colors together.
Pigment Size
Pigment size refers to the actual particles of color in the paint. When dry, pigment looks like colored dust or sand. Finer pigments usually offer smoother blends but may require more layers for full coverage. Coarser pigments can cover quickly but might not blend as seamlessly.
Its similar to resolution on a computer screen. Smaller pixels per inch give better resolution.
How to Wet Blend Acrylic Paint on Miniatures and Models: Simple 3 Step Tutorial
Step One: Prepare Your Paints
The first step is to get everything ready to go. You’ll want to work fairly quickly with acrylics. For set up I highly recommend a wet palette to hold the paint but it’s not 100% necessary.
Another tip is to use a little bit of flow improver or flow aid to reduce drying times, but again it’s not completely essential. Some water will do the trick
You want the paint on the thicker side, while still flowing really well. Start with one or two drops of your colors on your palette. Have a cup of water nearby to dip and clean your paint brush in.
Dip your brush in the water, and dab it slightly on some dry paper towel. This will wick off the excess water and you can then load up the brush with paint.
Step Two: Apply Your Paints and Blend Transitions
With your loaded up paint brush from step one, start applying the paint. I tend to start with lighter colors first, so in the example above I’d start with the orange.
Apply the first color, then either clean your brush, or use another brush for the second color. Here you will create a transition from one to another. It’s fine if it’s just a natural transition at first. Simply put the colors next to each other and the meeting point in between will be the area you blend
With the two colors still active (wet), start working the transition. Blend them together, working quickly but not chaotically. You can feather the paints in both directions, a zig zag, dragging them together and let them mix.
Remember if your paint is too thin, it will dry quickly. You want a base coat consistency. Nothing too heavy, just lightly thin paint to the point where it flows easily.
Once it starts to dry, stop working.
Step Three: Allow to Dry and Repeat if Needed
Once it starts to dry out, you need to stop working it. Dried paint wont mix and you’ll get a stained, blotchy result. Allow it to fully dry and you can do one of three things at this stage:
- Call it good to go! Don’t think that the transition needs to be perfect. Let it try and take a look at it from a normal viewing distance. Then you can decide if you want to work it more.
- Repeat step 2. Simply try again with fresh paint once it’s all dried. This is a skill and you will likely not get perfect results. Keep practicing.
- Glazing: You can use very thin layers of paint over the transitions to smooth them. What I suggest is mix your two colors, thin your paint down to a very transparent consistency and glaze over the transitions lightly. See if that smooths it for you.
How to Practice Wet Blending, Glazing and Layering
To practice this skill I recommend two things: Larger surfaces and similar colors.
In fact I would start with practicing blending two shades of the same color. Let’s say a darker blue and a lighter blue. When you are blending in miniature painting, it’s often done to represent highlight and shadow. The darker blue would be in shadow, the lighter blue is the highlight color.
For a surface, miniature bases are perfect. You may have a bunch of these already but they are simply round plastic surfaces you mount your miniatures on. Take a couple of them, prime it and you’re ready to blend. You can also try glazing and layering on the bases after you blend them.
Wet Blending Vs Layering and Glazing
When we talk about layering, it’s stacking one layer of paint over another. But done in a way where you can see some of the color before it. Think of a deck of cards spread smoothly on a table where they overlap a bit. You can see part of the card underneath, and the card above it goes over the top, and so on.
In painting it looks something like this:
You layer red on the bottom, go over it partially with orange, and over them both partially with yellow. This example is bright with harsh transitions, but if you used very similar colors, the transitions smooth.
Now picture using many layers of slight variations of a color, each a bit darker or lighter than the previous. You can layer each over the other to create a smoother transition than just two colors.
Blending techniques can vary, it’s just a matter of how you reach the desired result. When you paint miniatures, you’ll have a toolkit of techniques to pull from.
Layering and Glazing with an Airbrush
You can use wet blending on one mini, and your airbrush on another. Each can achieve a good result. For an example of an airbrushed gradient with a smooth transition here is one of my mini’s:
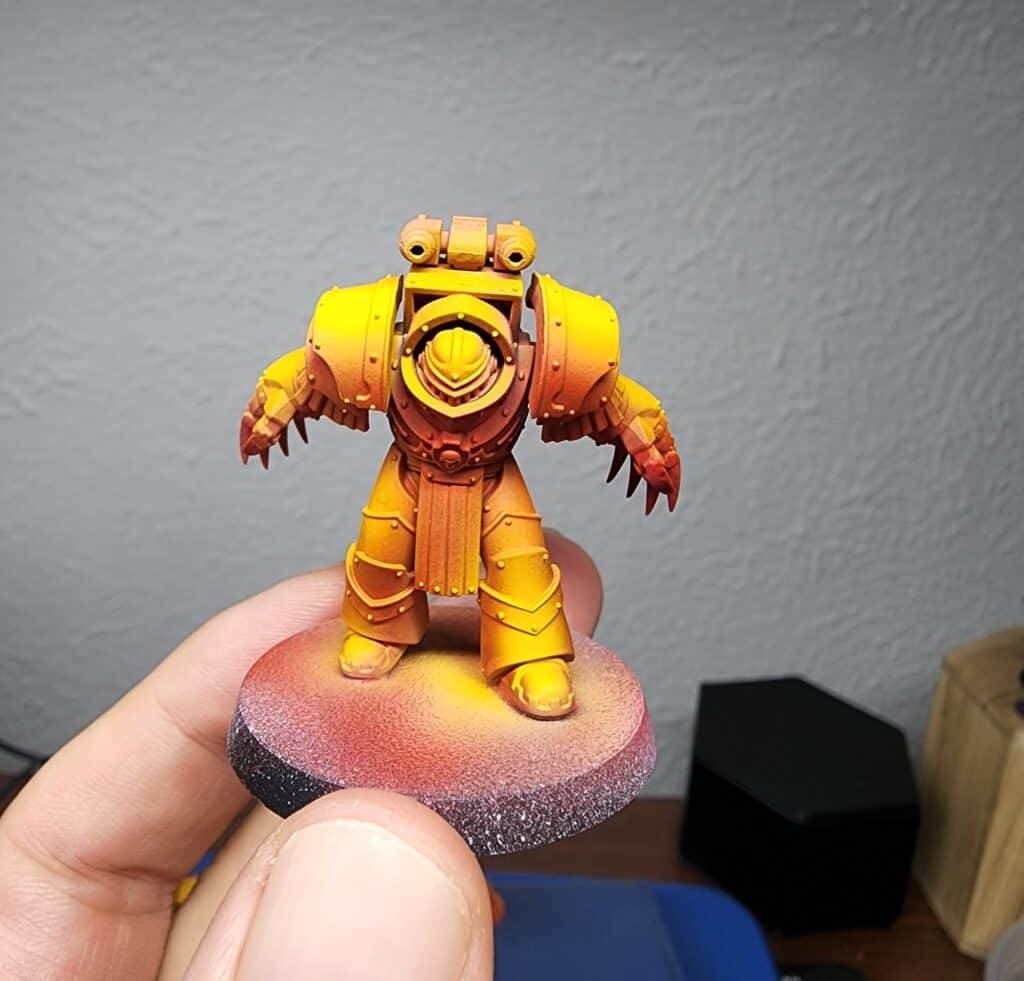
You can see it’s a pretty smooth gradient from bright yellow to darker orange. I did this with my airbrush using a more advanced technique (but still very simple). Spray it red. Spray over it with white, so the red turns a gradient of red to pink to white. Then finally spray over that with a transparent yellow. It’s essentially layering and glazing together.
Wet Blending with Acrylics vs Oils
When it comes to wet blending in miniature painting, the type of paint you use can make a big difference. The two most common types are acrylics and oils, and each has its pros and cons for wet blending.
Drying Time
Acrylics: These dry quickly, often within minutes. This can be both an advantage and a disadvantage. On the plus side, you can layer new colors faster. However, the quick drying time means you have a shorter window for blending, which can make it challenging to achieve smooth transitions.
Oils: Oil paints take much longer to dry, sometimes days. This extended working time allows you to blend colors more leisurely, making it easier to achieve smooth transitions. However, the long drying time also means you’ll need to wait longer before adding new layers or details.
Using oil paints is much less common in miniature painting, but definitely not unheard of.
Impact on Wet Blending
Acrylics: Because they dry quickly, you’ll need to work fast to blend colors seamlessly. Some artists use blending mediums or retarders to extend the working time of acrylics. It’s challenging to do at first with acrylics, but certainly not impossible.
Oils: The slow drying time gives you more freedom to blend, adjust, and rework your transitions. However, you’ll need to be patient and possibly leave your miniature to dry overnight or longer before you add additional layers or details.
Using a Wet Palette for Wet Blending
A wet palette is essentially a shallow container that has a sponge filled with water beneath a sheet of parchment paper. You put the paint on the parchment paper and the water slowly wicks up to the paint, keeping them wet and activated. Here’s how it helps and how to use it:
Why Use a Wet Palette?
- Extended Working Time: A wet palette keeps your acrylic paints moist for a longer period, giving you more time to blend. Wet paint will stay active and workable for a while.
- Consistent Paint Consistency: It helps maintain the paint’s consistency, making it easier to achieve smooth transitions.
- Less Waste: Since the paint stays wet, you waste less paint, saving money in the long run. I can keep my paint for a week or more on my wet palette and not have to refresh it.
Eventually the paint will get too thin, so just be aware of that. Some people also report they’ll see mold in the wet palette but I’ve never had that problem. Just clean it now and then.
How to Use a Wet Palette for Wet Blending
I mentioned using a wet palette above so I figured I should lay out what I do
- Set Up: Fill the bottom of your palette container with water and place a piece of parchment paper on top so it absorbs the water. Don’t over fill the container, the sponge should be fairly full but not submerged in water.
- Place Paints: Squeeze out your acrylic paints onto the parchment paper. I just put a couple of drops from a bottle on the paper.
- Mixing: You can use the wet palette itself to mix different colors before applying them to your miniature. Meaning take your colors and mix them right there on the palette, rather than on the miniature. It’s not necessary but it can be done.
- Application: Load your paint brush with paint from the wet palette and apply it to your miniature. Try not to use very thin paint, just thin enough that it flows easily and doesn’t have much resistance. You want a good amount of paint on your brush, while being in control of it.
I’ll have a full article up soon for this, in fact by the time you read this it might already be up. They’re really handy to have, not just for wet blending.
Wrap Up, Resources and Video
Ok that’s about it for wet blending. Don’t be afraid to give it a try. I’ll go ahead and leave a good video on it here for you to check out: