Miniature Painting Tips for Beginners and Beyond The Big 3 (Plus 13 More for 2023)
Beginners and veteran miniature painters can all benefit from the tips I will go over in this article. It’s helpful for me just to get them all in one spot, and I hope it gives you what you need to improve or even get started painting miniatures.
I want to get right into it with the three tips that had the biggest impact on my painting. I see them as fundamentals and not talked about enough in the community. I think maybe it’s because once you get a routine and habits that work, you don’t really tend to stray from it.
After my big 3 I have 13 more for you with smaller tips in each.
Three Miniature Painting Fundamentals For Beginners That Improved My Skill The Most
1. Stability When Painting
This is all about trying different ways to keep yourself steady when painting. Having brush control is much easier when you can keep your hands and body fairly still. Here are some of the methods I use and others you can try to see how they feel:
Brace your palms against each other. Take the heels of your palms and press them together. Holding your brush in your preferred hand, and using your other hand to keep things still.
Place your elbows on your desk, or alternatively, brace them against your chest by pulling your arms in tight. Keeping the elbows stable makes keeping your hands steady so much easier. Doing this was a big breakthrough for me when it comes to control.
Use a painting handle. Painting handles are very cheap, and making your own is also easy with common items around the house. Many people use an old aspirin bottle or even a piece of wood. You can use some sticky tack or putty to fix on top to hold your miniature.
Painting handles can also be used to brace your palms and hands against for stability.
Control your breathing. Typically this doesnt come up for me unless I’m doing something very small like painting eyes. If I need to center the dot on a pupil of a very small miniature I’ll usually hold my breath, and give it a try.
Sit, Stand or even Lay Down comfortably. I personally sit, but I know people who stand or need to lay down due to physical restrictions. The goal is to find whats comfortable but also provides you a good base to keep steady while painting.
It’s well worth your time to find what works for you. I had a big jump in ability from finding ways to be stable and comfortable. It took a bit of experimenting, and the more experience you have with a paint brush, the more control you’ll have.
Stability just makes the process so much easier.
2. Lighting to More Clearly See What You’re Doing
Don’t underestimate the value of a good clean light. If you’re just making due with the lighting you have available, you might be surprised by how big a difference a simple lamp and good bulb makes.
You don’t have to spend a lot, I would suggest a very inexpensive desk lamp on an adjustable stand, and a good daylight LED bulb rated for around 5000k. 1000+ Lumens. This is a very strong clean daylight color bulb that very accurately reflects color. It should be under $30 for a perfectly good set up.
Warmer or colder light distorts the hues a bit and you’ll see better with a nice clean light.
Since trying it, I have become totally dependent on good lighting. I used to paint with just whatever I had available, and the difference now is dramatic.
3. Magnification to See Where to Apply Your Paint.
Your eyesight might be excellent but I still think there is a lot of value in getting some magnification. I still find it to be one of my favorite painting tips. Miniatures are small to begin with and when you’re trying to paint very small sections of very small miniatures, any magnification will simply make it easier.
When it comes to options, most people use either magnifying goggles, or a hobby magnifier. I personally use the hobby version, which is just a round magnifying glass on a gooseneck lamp. Mine has a light as well on it and it really is indespensible for me when I’m painting.
I’ve also played around with other options, jewelers loops and even an electric magnifier that basically shows you an enlarged image on a screen. They might work for you but I found the Hobby Lamp to remain my go to option.
I credit the combination of stability, lighting and magnification for my ability to make my miniatures look “clean”. Those three tips are my fundamentals, and of course more experience lends itself to improvement.
Once you have those locked in, you’re ready for more super helpful miniature painting tips I’ve picked up along the way.
13 More Miniature Painting Tips To Improve and Speed Up Your Painting (and more)
1. Perfect Your Paint Consistency.
This means the thickness and viscosity of the paint you are using. I’ve heard others give some ideas on how to visualize this, and some say to try for the thickness and consistency of skim milk.
TIP: Personally I like the advice of : Thin your paint until it loses its resistance.
When you drag your paint on your palette, is it fighting you? Or is it smooth and effortless. What you want is smooth application, but not be so thin that it’s watery and inconsistent.
This is something you get better at over time and my tip here is to pay a lot of attention early on to your paint consistency. There is no one method of getting paints thinned enough for use on painting miniatures. Each paint is a different thickness, brands vary, even within brands the colors vary.
The other consideration with consistency is what you’re trying to do. Base coats can be thicker (but still thinned), and glazing is a very thin consistency.
Spend some time getting familiar with what a good smooth consistency is for your painting. It should look smooth and clean when it dries on your miniature. Also keep in mind that the surface you are painting matters. If it’s not smooth the paint wont look smooth.
2. Picking the Right Brush.
The big considerations here are brush size and brush material. Other things to think about are bristle length and “snap”.
TIP: Try at least one of the following: Inexpensive synthetic brushes, Professional quality Sable Brushes, Long bristle brushes, short bristle brushes, and sizes 0-3.
This doesn’t have to all happen at once, and shouldn’t cost you more than you’re willing to spend. Inexpensive synthetics are $8 for a pack of 20 with various sizes and shapes. A single very good quality Sable can run over $30 but certain brands can be found for under $10 USD.
I encourage you to try sizes 0 through 3 paint brushes. This is a good range to work in, and you should get a feel for each. Bigger brushes with sharp tips get a lot done.
TIP: Do not equate small brush size with being especially needed for small objects like a miniatures eyes. What you want is a very sharp tip. A teeny tiny brush wont hold much paint, that means it will dry very very quickly. Especially if it’s a color like white, which tends to dry faster due to the pigments used.
If you’re painting eyes, a sharp tip with a brush that has a fairly large belly (the fat part of the brush below the tip) will hold some paint, and not dry quickly. This allows the paint to flow easily off the tip.
TIP: Consider using a medium like flow improver if you find the paint dries quickly. Flow improver has a retarder in it that slows dry time.
Finally, try different brushes to judge the feel you like most. For example, my Rosemary and Co Series 33 brushes have longer bristles with good “snap” to it. Snap meaning how the bristles bend and recover.
There is no “best” when it comes to length or snap, it’s personal preference. Trying different brands of brushes and paints is one of the best miniature painting tips I’ve gotten. It was a dramatic difference trying the good sables vs the cheaper synthetics I had been using.
Sables and inexpensive synthetics both get plenty of use from me, so it’s not an either or. They are tools in your toolbox.
3. Light and Dark, Highlight and Shadow.
One of the core pillars of art is understanding how light and dark work on figures. Having a sense of this makes your miniatures look much better, become less “flat”, and are read by your eye as looking realistic.
TIP: The best way to illustrate this is with a miniature you’ve primed in black. Turn off your lights, and put one light source above the miniature. A lamp or flashlight, whatever you have available. Notice where the light falls and where the shadows remain.
If you can start to see how light falls and mimic that with your painting, you’ll be much further ahead in your journey.
TIP: A very quick way to achieve a light/dark result is with washes or contrast paints. These are both designed to have the darker pigment flow into recesses where shadows would naturally fall. While keeping brighter color on the higher surfaces.
I’ll cover washes below, and Contrast Paints, Speed Paint, XPress Paint is all very similar. They are the more modern version of washes and are a bit thicker. Meant to be applied as it’s own paint rather than a wash which you can use over a base coated model.
4. Try Priming in Different Colors.
When starting out, one of the miniature painting tips you’ll see is to prime in black. The reasons for this is pretty simple, it’s one less thing to think about, and more importantly, the black will look like shadow if you miss any hard to get spots.
While I still primarily will use black, I’ve definitely opened my mind to other colors. Specifically White and Red in my case, but you can use any color that works for your project. If you find yourself doing a squad of blue Warhammer 40k Ultramarines for example, a nice blue prime might make sense.
The most common prime for me right now will start with black, but then I will spray white over the top in a Zenithal Prime. This is a quick and easy way to get your highlights and shadows visible from the start on your miniature.
Another method I’ve recently come across is either priming, or base coating Red, and then spraying white over it in a very heavy Zenithal. The result is a gradient of near white, to pink, to a sort of heavy pink, light red. Then, once that’s done, I’ll spray a Transparent Yellow Paint over the top.
The transparent nature of the paint, allows the undercoat to show through. The result is a fantastic, deep, rich yellow. At the highest points where it was near white, you now have vibrant yellow. At the deeper points it goes to a gradient of a yellow-orange, and makes great shadows.
Check out the Imperial Fist Space Marines in My Gallery for examples of what I’m talking about here.
5. Try Various Washes on Your Miniature
When I first started painting miniatures in 2019, I remember hearing about washes. The youtubers I listened to all mentioned them in some context, but the first time seeing it and then trying it… kind of blew me away.
I’ll never forget watching Jeremy on Black Magic Craft. He was doing a beginner tutorial. When he got to washes he called them “the instant talent in a pot, the wash“.
Now THAT’s a painting tip.
To this day, if you are new and want to try something to give your miniatures more depth, I highly suggest trying a wash. While you can make your own, I highly recommend Citadel washes for this. Nuln Oil, Agrax Earthshade, and others.
They are pricey, but they go a long way. They’re excellent at what they do and they have an extremely low skill barrier. Meaning you literally just get a bit on your paint brush and put it on the miniature. Done.
TIP: When using a wash, watch for pooling. Pooling is the extra build up of the wash in creases. You dont want too much in one spot. Dip your brush in some water to clean it, dab it on paper towel to get the excess water out, and simply touch the tip of your brush to the pooling areas. Capillary action will wick the extra away.
It’s a very simple step and makes an enormous difference. When I first started, washes were an integral part of my process. I would simply prime the miniature, base coat it, then do a wash. From there if I wanted to really get fancy I’d add a highlight.
A minor point to add quickly – You can use washes on your wet palette but I don’t. I typically go right out of the citadel paint pot.
As I progressed in skill, I used washes less often. It’s still a big part of my toolkit, but it’s not “ok I do this every time”.
TIP: When using washes, once they start drying leave them alone. If it’s partially dry and you move it, you’ll leave behind “tide marks” that look awful. If that happens, just apply your base coat over the section and do it again.
One final thing to mention, and I don’t mean to overwhelm you here. When you’re ready, try using a Contrast Paint, thinned with some Contrast Medium. They act very much like washes and honestly might be even better for that purpose.
One of my favorite ways to do faces typically starts with a base coat of Citadel Bugmans Glow, and then a thinned down Guilliman Flesh Contrast Paint. From there you go wherever you want for skin tone. Darker, lighter, wherever. It’s a fantastic starting point.
6. Basing, Pigments and Texture Paints.
This is another overlooked area of miniature painting tips. Basing is tremendously impactful. You can establish the environment the miniature is standing in. You can add more continuity to your squad of minis by having similar bases.
Bases don’t have to be difficult. Texture Paints for example are easy to apply. You just get a bit on your brush and spread it on the base. Instant improvement.
From there you can add things like Vallejo’s pigment powders for some random color. Or maybe you put a wash over it to define the creases more. You can add a simple tuft of grass or flowers.
TIP: Vallejo makes great texture paints. They are high quality and the bigger jar of 200ml will last you a long long time. I personally love the Russian Mud. But they have tons of options.
TIP: Vallejo Pigment powders are very easy to use. A bit on your brush, spread it around. You can seal it in with varnish when you’re done.
Typically I’ll just use it out of the jar, but don’t add a texture paint to a wet palette.
7. Work With More Mediums and Thinners
While you mostly just need water when working with acrylic paints, it’s worth knowing about the other options. They have different properties and learning about them was one of the bigger miniature painting tips I’ve gotten.
Flow Aid – Flow Improver: I use Liquitex Flow Aid nearly every time I paint. I have a mix of 5 parts water to 1 part flow aid in a dropper bottle on my desk. I’m looking at it now it’s almost empty, time to mix some more.
Flow aid will reduce the surface tension of the paint. It allows it to, well flow better off the brush. Flow aid will also act as a drying retarder and give you more time to work with your paints.
TIP: When painting something super small like eyes, use flow aid. Get yourself a good paint brush with a sharp tip. Put the white paint on your wet palette and thin with flow aid/water mix. Get paint in the belly of the brush, and wick off excess on a paper towel. Now apply.
Flow aid is a game changer and one of the best painting tips I can think of when it comes to small fine detail work.
Glazing Medium: Glazing is simply applying very thin, transparent layers over the existing paint or primer. This medium makes the acrylic paint thinner, more transparent, and easy to apply.
While simple water or even flow aid can do similar things, this is a superior medium for the specific use.
Contrast Medium: This is another specialized medium made by Citadel. It’s the medium they use for their contrast paint, without any color pigment in it. With this, you can either thin existing contrast paints (see above in the Washes section), or you can make your own contrast paint.
TIP: I use contrast medium a lot for my contrast paints. It’s expensive, but you don’t need a ton. Try it on Guilliman Flesh and Black Templar for fantastic washes.
Airbrush Thinner: This is simply a neutral medium, with a bit of acrylic drying retarder. It thins the paints, lowers viscosity so it doesn’t stick to your airbrush, and allows it to flow smoothly.
Airbrush Flow Improver: Similar to the thinner, this has more emphasis on delaying dry time. I use this through my airbrush every time I paint.
TIP: I’ll shoot some flow improver through my airbrush to keep things moving smoothly and prevent paint drying inside the airbrush.
8. Try Inks and Transparent Paints
Inks and Transparent Paints are something to try out once you’ve gotten proficient with standard acrylics. Typically inks and transparents have very strong pigments and are bold, powerful colors. A little goes a long way.
They are also both more transparent than standard paints. You’ll get a lot of color, but you can also see the layers you’re painting over. So for example, placing a layer of yellow ink or transparent paint over a red base coat, you’ll get an orange.
TIP: If you want a very smooth gradient, try laying down a base coat of one color, then either airbrush or dry brush on white over it in the areas you think would be brightest. Finish with a thin layer of ink or transparent paint.
Inks will also flow very smoothly, and my first experience with inks was with Daler Rowney White Ink. If you’ve ever tried standard acrylic whites, you might have experienced that they are tough to work with. Very dry and powdery, hard to get it to flow nicely. Inks do not have this problem.
TIP: White Ink is great for painting eyes. It flows nicely off the brush right out of the bottle.
Be careful when adding an ink to a wet palette. It might dilute it too much.
9. Try Zenithal Priming Your Miniature
Trying your hand at Zenithal Priming is one of the best miniature painting tips I can give you. It’s become a foundational method to almost everything I paint recently. Painting Miniatures is an art and there are a lot of ways to get to a result you’re happy with.
Zenithal Priming is: Base coat in one color, and then spray another color on it from above (the Zenith). The effect is meant to mimic the sun shining onto your subject at mid day. So when we talk about a Zenithal we usually mean a black base coat or prime, followed by a white zenithal spray to mimic sunlight.
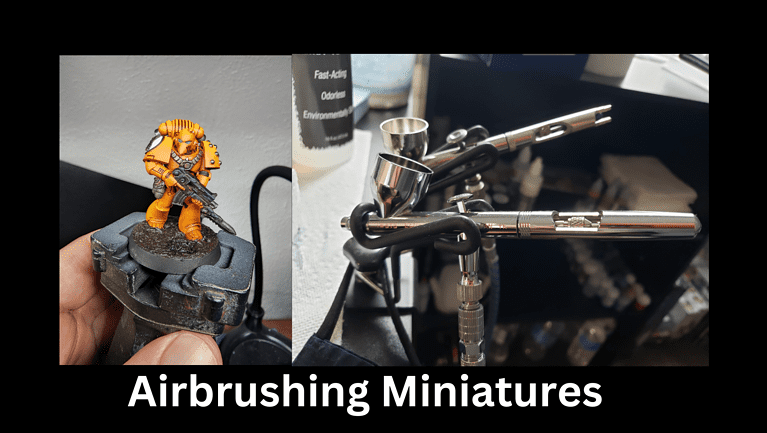
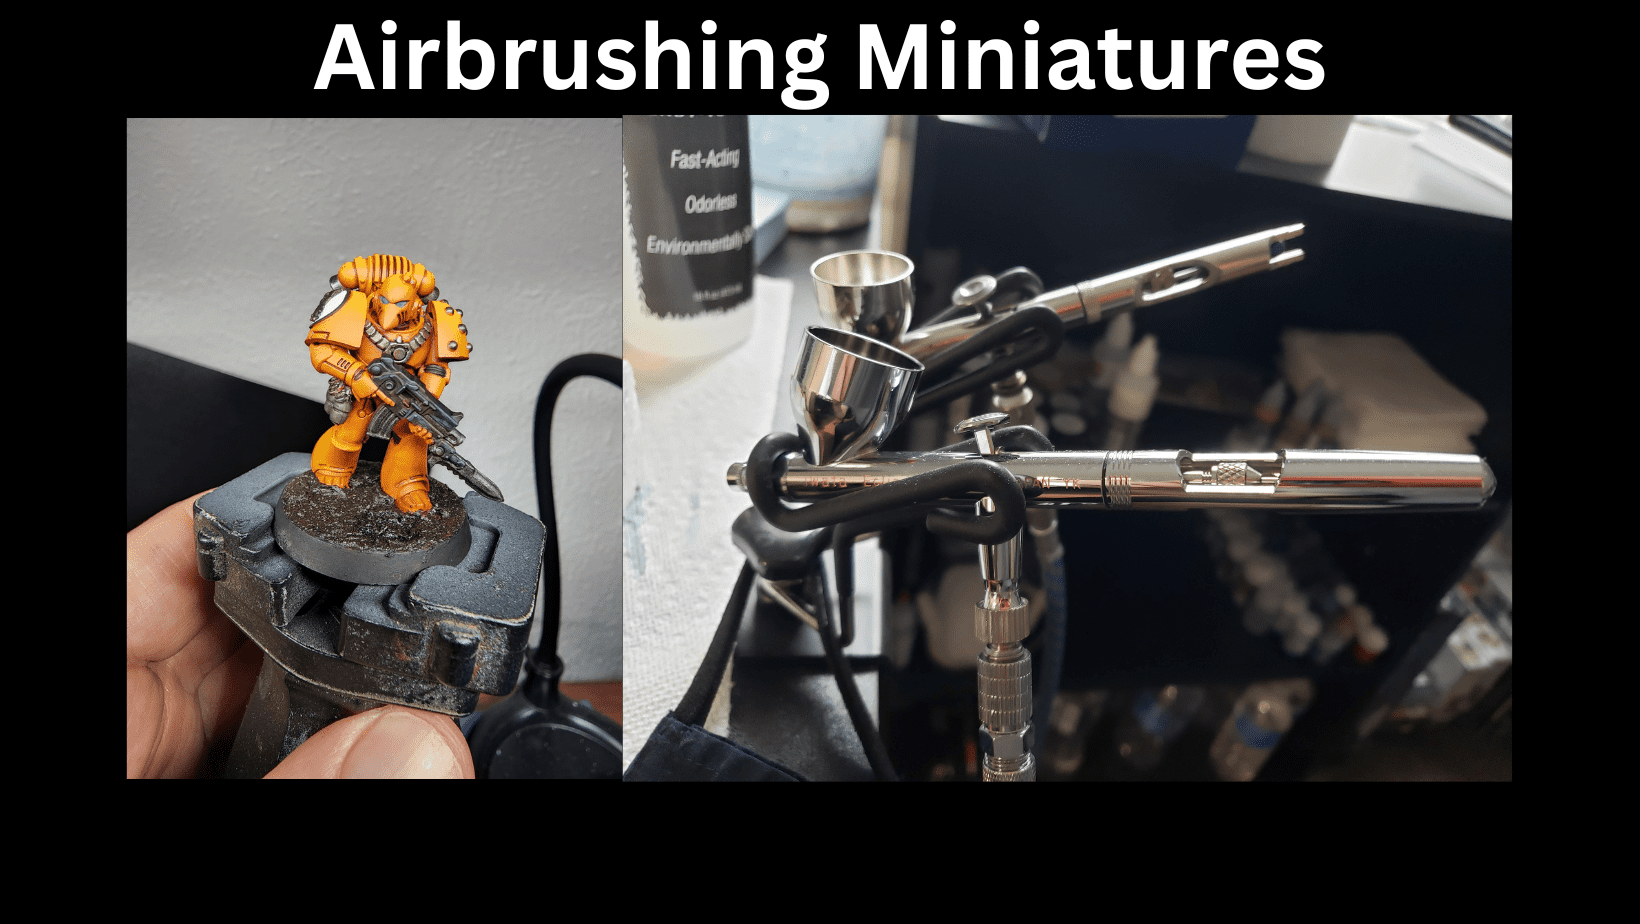
TIP: Zenithal Priming is one of the bigger reasons to invest in an airbrush as it makes the process smooth and quick. You can also do it with a dry brush method though so don’t let an airbrush hold you back.
10. Learn About Color Theory and the Three Color Rule
Color Theory gets brought up a lot when you’re painting miniatures. It is the set of principles and rules that allow us to better understand how colors differ and work together.
Primary Colors, Secondary Colors, Complimentary Colors, Analogous, Triads, Cold and Warm, Saturation, Hue, and much more. It’s a bit much to get into all the details here. Just understand that a basic knowledge of these guidelines is very helpful in miniature painting.
TIP: My big color theory tip is to buy a simple color wheel or bookmark one online like this one. So when you know you want something painted blue for example, you can reference the wheel and see what might be a good compliment to it.
The Three Color Rule as it relates to miniature painting is pretty simple, you dont want too many colors on your figure. I remember first hearing this from Sorastros Painting. He mentions trying to roughly break it down into thirds and not use too many colors.
If your paint job looks “wrong” to you, one of the reasons might be too many competing colors. One my favorite miniature painting tips is to try for more simple and clean looks. You want your painted miniatures to be easy to “read” and well defined areas, with simple highlight and shadow, make that much easier.
12. Try Pin Washing and Panel Lining Your Miniatures
Pin Washing and Panel Lining is the process of adding a layer of paint or color (usually black) to the seems between sections of your miniature. For example if it’s a knight with plate armor, you would pin wash the seems between the armor plates.
Pin Washing and Panel Lining are terms that are interchangeable when painting miniatures. Panel lining is more commonly used for Gundams that have a lot of seems on the giant mech models. I’ve heard the term pin washing more in miniature painting circles. Ultimately they mean the same thing.
TIP: Pin Washing your miniature is one of the steps that can make an enormous difference in the final result. A black pin wash can really make the model look clean and well defined. Much easier for the eye to read.
Tamiya makes an excellent Panel Liner that I typically use. It’s an enamel based paint, and you simply take the brush applicator provided, and gently touch it to the seems in your miniature. Might take a bit of practice to perfect, but well worth the time.
13. Learn How Dry Brushing Can Help Your Miniature Painting
In my years of painting miniatures, Dry Brushing is one of the miniature painting techniques I’ve taken the longest to appreciate. It’s so simple and effective, I really have made it a point to use it more often.
It’s actually a fairly deep technique, and you’d have different applications of it. You wouldn’t necessarily use a wet palette for example, but a dry surface.
TIP: With the massive popularity of SlapChop in the miniature painting community, Dry Brushing has become even more important to add to your miniature painter tool kit.
In Closing…
I hope these tips help you improve on your journey in miniature painting. Painting Miniatures is a progression like anything else. You’ll get better over time, building up your collection of fully painted miniatures.
Remember, we’re not all in the same place. I’ve been Painting Miniatures for years and I still feel like a noob. The miniature hobby is very rewarding and I’ll look at my painted miniatures almost every day. It makes me smile 🙂
My goal with this site is to help people who are looking for miniature painting information. If there is anything miniature painting related you want to see definitely leave a comment below and I’ll be happy to consider it!