The 4 Most Popular Techniques for Speed Painting Miniatures
Speed painting is relative. To some that means getting a miniature fully painted in under 30 minutes. To others, 2 hours is the pace they are comfortable with. Realistically I like to look for the best ways to simply speed up what I am normally doing, without losing much quality.
The other major benefit is getting a batch of miniatures painted and ready to go. This is great if you’re playing a game and need your minis quickly, or if you want that deep sense of accomplishment from completing a whole squad or army!
Speeding Up Your Painting Session:
We’ll tackle this in three sections:
Four Speed Painting Techniques: Standard Method, SlapChop, Zenithal Priming, and my favorite: Pre-Shading.
Planning: We will cover some basic planning steps to make your paint session go quickly and efficiently. Color palettes, documenting, and simplifying.
Tools: Using spray cans or an airbrush will drastically speed up base coating and other techniques. Larger paint brush sizes allow you to cover more surface area, quickly.
The 4 Most Popular Speed Painting Techniques
We have the Standard method, SlapChop, Zenithal Priming and Pre-Shading. Here we go:
1. Standard Method to Speed Paint Base Coat and Details
The standard method of painting can still be done quickly. If we look at a Space Marine, you’ll see the majority of the miniature is blue (or red, or whichever color of the chapter you’re interested in). So getting that base coat on quickly, and using a minimalist paint palette, you can get the job done quickly.
Speed up your base coats with a spray can, airbrush or large paint brush. Limit your palette to 3-5 colors to speed things up further.
For this Space Marine I painted, you can see the color scheme is very simple: Blue, Gold, Brown, with a little red and white thrown in. I spent more time on his face, but most of this was done very quickly. I used an airbrush for the blue, then painted in the details:

2. Speed Painting Miniatures with the SlapChop Method:
We’ll start with SlapChop because it’s the most beginner friendly method, and it doesn’t require any special tools. For a full breakdown of this method you can check out my article on SlapChop painting. Here are the essentials:
- Base coat or prime your miniature in black.
- Heavy dry brush the miniature in a light grey.
- Dry brush the miniature on the edges with a white or off white.
- Apply one layer of Citadel Contrast Paint, Speedpaint, or XPress Color paint for color.
Essentially what SlapChop is achieving is establishing a general light and dark gradient on the miniature. The black base coat is the shadow, and your grey and white dry brushing is representing where the brightness increases.
Then for color, you’re are building on that light/dark contrast with the contrast paints. Contrast paints are designed to stay brightest on the higher points of the surface, and the darker pigments flow into recesses where you would see shadows.
The result is a very quickly painted miniature with bright color and good contrast.
3. Zenithal Priming to Speed Up Your Miniature Painting
Zenithal Priming is essentially what we discussed above with SlapChop: Start with a single color to prime your miniature, and then partially apply another color from the top down.
Zenith simply refers to the “highest point” the sun achieves going overhead. So a Zenithal Prime is mimicking the sunlight shining down on your miniature when the sun is directly above it.
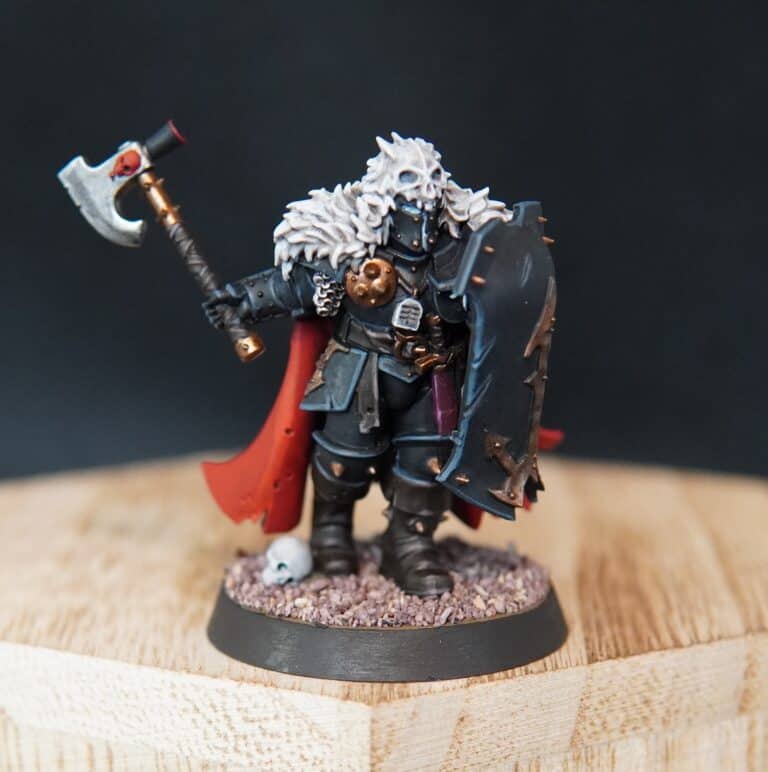
You can see here what I mean, the light source is above, and his helmet and shoulder pads are lit well, the rest is in shadow. Of course a brighter light, or broad daylight would mean more of the miniature is well lit.

You can just put your miniature under your desk lamp to simulate this and see where light and shadow naturally fall.
What you’re trying to do is keep darker colors at the opposite end of your light source, and brighter colors closer to your light source. So if the sun is overhead, light on top, dark on bottom. If there is a campfire on the ground at night, the light is coming up from the bottom, and darker colors on top.
You can apply the zenithal prime with a drybrush technique, or a spray can, or an airbrush.
For SlapChop it’s usually a black and white zenithal prime, but it can be any colors. In this image you can see the result of my Zenithal Prime. These miniatures were primed in red, and then I applied a heavy zenithal spray of white over the top with my airbrush:

So in this case the darker red is at the bottom edges, and the white is on top. Now when I add color to the miniature, that color will look brighter at the top, and darker in the shadows.
4. Pre-Shading or Under Shading Miniatures for Quicker Painting
Pre-Shading is my personal favorite technique these days. The goal is to get your contrast on the miniature first, then apply a transparent color over the top. You can get the pre-shading done with zenithal priming, as outlined above, or you can apply darker shadows to a light color.
Remember to stick to the fundamentals of light and dark for your contrast: Wherever the light source is, should have the brighter color. Shadows would be obscured by the light. If your miniature is meant to be standing with the light source above him or her, the highlights on top, shadows below.
As with the other techniques, you can do this with dry brushing, a paint brush or an airbrush. While I suppose it’s technically possible to use a spray can, it’s much harder to control the amount of paint you apply.
I prefer to do my pre shading as a Zenithal prime, but instead of just black and white I tend to use other primary colors. In the example above I used Red as my base color. This is because red and pink is a good under shade for Yellow. Meaning yellow is naturally semi transparent in thin layers. You’ll see the color underneath. If that under shade is pink, the yellow takes on a warm orange hue, which looks great as a shadow for yellow.
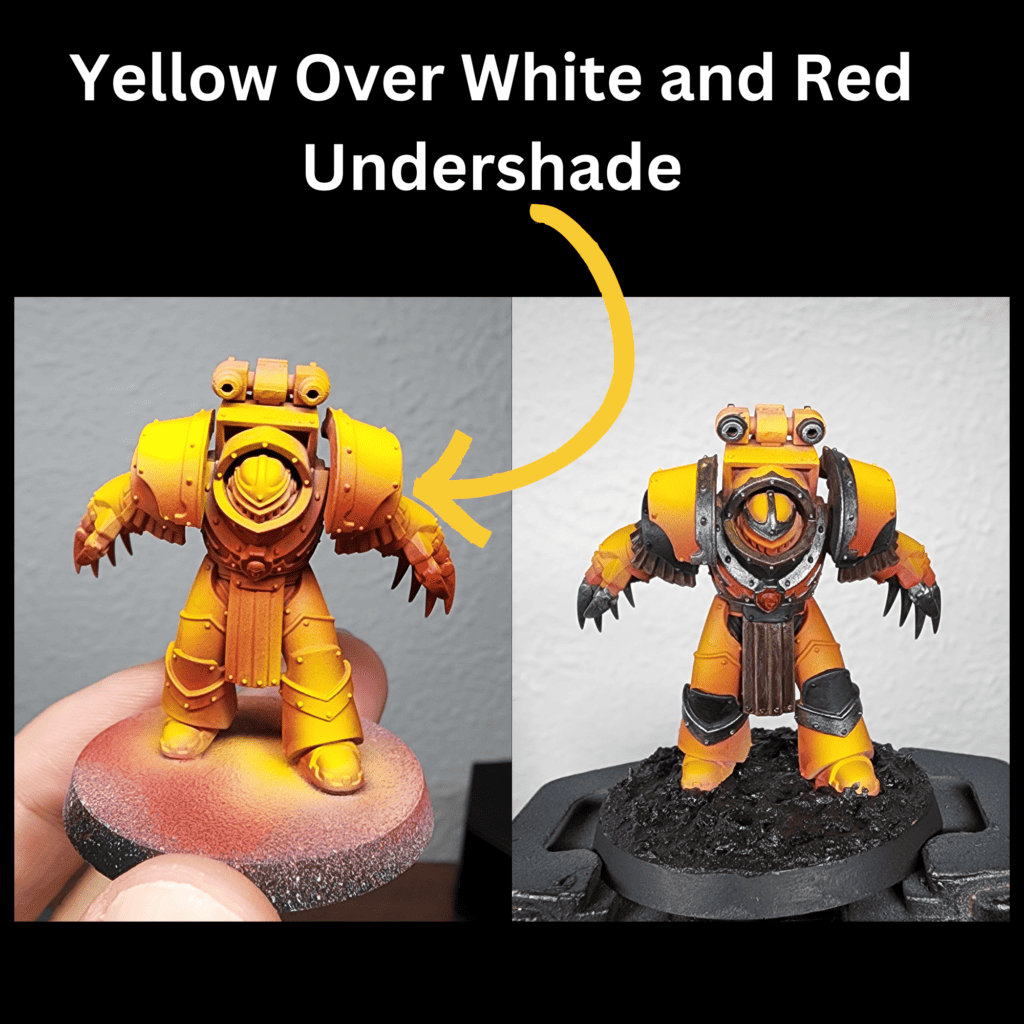
You can see how the top is very bright yellow, while there is a gradient to an almost orange brown, as a shadow. It looks very smooth in this case because I used an airbrush. The specific colors if you’re interested were: Mephiston Red for a base coat. A heavy zenithal prime with white. A light coat of Vallejo Transparent Yellow. You can also use any yellow Citadel contrast paint you prefer for this, but I preferred the Vallejo in this case.
Planning your Process for Speed Painting
The painting process can be very straight forward, but it’s worth thinking about. I tend to write it out if I’m doing more than one miniature of the same type.
Document the steps you want to take, from start to finish. Give specific color paints you will use. Plan the order you will paint in. Have all your paints, brushes, and other tools ready to go.
This is a great opportunity to make the painting efficient. Do you need a ton of colors? Can you simplify the paint palette by reducing the amount of colors you use. When in doubt I tend to use a lot of black personally. It keeps the miniature from looking too busy.
It’s also a good rule of thumb to start painting either the largest areas first, or paint from the inside out. Inside out just means paint the deepest parts of the miniature first. If the figure has some skin showing underneath his armor, paint the skin first because it’s underneath.
Now is also a good time to decide if you’ll varnish the miniature once you’re done. Will you use a matte coat or satin? It’s worth taking a bit of time to consider these things before starting.
Using the Right Tools for Speed Painting Miniatures
The big ones here are: Airbrush, spray cans, large paint brushes, contrast paints, washes and dry brushing. Many of these are very basic and inexpensive, but an airbrush requires a bit of investment. Let’s start there.
Using an Airbrush For Speed Painting
If there is one tool to consider spending a bit of money on in miniature painting, it’s the airbrush. As I’ve said many times here, they are easier to use than you might think. You can get up and running with your first set up very quickly.
An airbrush will help you paint your miniatures much faster, and to a high quality. This doesn’t mean you would only use an airbrush, but if you want to paint quickly it’s absolutely a tool you’ll want in your kit.
I want to be clear though, if all you will do with it is prime in black or white, you’re probably better off just getting a rattle can primer. Same for simple basecoat applications. If you want to get a ton of blue Space Marines base coated, just buy a spray can of the color you want.
What you will use an airbrush for as a miniature painter, that can’t be replicated by spray paint cans is:
- Spray painting in any color paint you own.
- Spraying on very precise highlights or shades
- Varnishing your miniature
- Airbrushing very thin transparent layers
- Extremely smooth transitions between colors.
For those reasons, and many more, an airbrush is worth investing in if you’re painting a lot.
How Spray Cans can Speed up Your Miniature Painting
Pretty straight forward here, I wont take up too much time with these but if you haven’t tried them, it’s absolutely worth your effort.
Spray cans are MUCH faster than using a paint brush when it comes to applying a single coat of paint or primer. The catch here of course is that you don’t have a ton of accuracy. These are best used for priming or base coating.
Note that you absolutely CAN use spray can’s to Zenithal Prime. A very simple, but common way to do this is prime with black, then spray white on the miniature from above.
If you don’t have an airbrush, you should definitely pick up some primer at the very least.
If you’re painting an army, look into a can of the main color of your army. So for example if you’re doing Games Workshops Space Marines, look at a can of McCragge Blue spray paint.
Large Paint Brushes and Dry Brushes
Something as simple as a bigger paint brush helps speed things along. Anything from a size 5 artist round brush up to a 10. You can also look into angled brushes or filberts if you’re painting something fairly big.
For drybrushing, you can use paint brushes specifically made for that technique, or using something like a simple inexpensive make up brush.
Citadel Contrast Paints and Similar Products for Speed Painting
If you’re not already familiar, games workshop’s Contrast Paint is meant to go on in one coat. It’s made to flow into recesses and keep higher areas bright and recesses darker. This contrast gives a more dynamic final look than a flat coat of paint.
These paints have been wildly popular and are used to get miniatures painted quicker than standard paints. It’s not that the paint goes on any quicker, it’s just that you get a better result with a single coat of contrast than you would with standard acrylic paint. So you’re getting more for your time.
Contrast Paints have spawned a whole host of similar paint by other brands. Army Painter Speedpaints, Vallejo XPress Color, Green Stuff World’s Dipping Inks and more. All are high quality, and all have different colors and properties.
I have a full tutorial on using contrast paints for you if you’re interested.
Finally there are washes. Washes are old school contrast paints. They are very watery, thin, and easy to use. The classic wash is Citadel’s Nuln Oil. I have a full tutorial on washes for you to check out if you’re interested. Let’s put it this way, washes have been called “liquid talent in a bottle”. They are hugely impactful and extremely easy to use.