How to Make a Diorama with Miniatures
To make a diorama, we’re going to need more materials than we would for a typical mini build or conversion. The process is somewhere between painting, kitbashing, and terrain building. However, there’s another element that’s maybe the most important of all: storytelling.
Even a simple diorama tells a story.
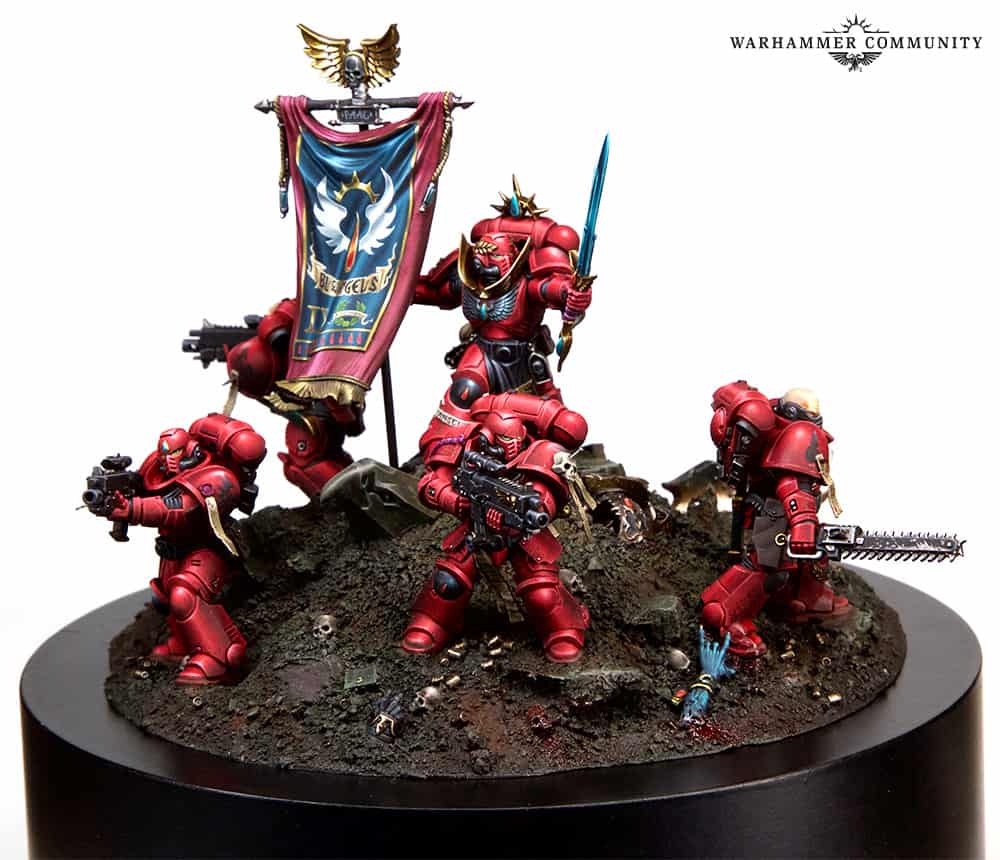
Here, a squad of Blood Angels primaris space marines stand their ground against the slavering demonic hordes of chaos.
It’s a scene that plays out in almost every depiction of space marines, and shows off the talent of the painter and the unity of the squad by telling a clear story of a valiant stand.
You can make your story as complex, or as simple, as you like. The only thing that matters is that you’re telling a story that the viewer will be able to interpret. A great way to do this is finding ways to convey a sense of dynamic movement in what is a static piece of art.
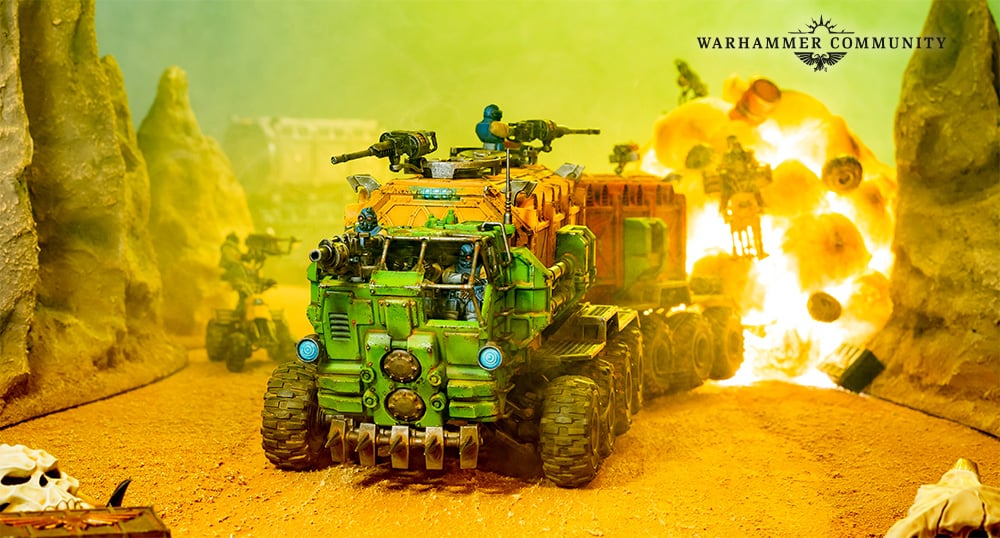
For example, this amazing, Mad Max: Fury Road-inspired Necromunda diorama even has a simulated explosion behind the the war rig.
It can be really helpful to sketch out some ideas for your diorama, brainstorm the elements you want to highlight, and think about the kinds of effects that will help tell your story.
Will the scene call for dramatic lighting? Explosions? Extensive weathering? Dramatic elevation changes?
Once you have an idea of how your scene will look, it’s time to grab some materials.
Diorama Materials
It’s simplest if we break down our diorama into two categories to help understand the materials and techniques we’ll need.
The Miniature(s)
These are going to be the centerpiece of the diorama, so choosing the right models is key.
If you don’t have the exact models your want to portray a particular character or monster, you may have to do some kitbashing and sculpting (using an epoxy putty like Green Stuff to fill gaps between parts that weren’t supposed to go together, add details like fur and capes, or even sculpt entirely new body parts).
If you’re looking to pose your miniatures in a certain way, you may also need to saw (or clip) them apart and reposition them.
You will need:
- Miniatures, obviously. You should probably also get some extra miniature bits like guns, heads, shoulder pads, etc. if you want to alter the look of the miniatures in your diorama. These extra bits can also be really useful when decorating the base of the diorama as well. Obviously, you’ll need glue (I like to use plastic cement, but superglue or other adhesives are also fine), clippers, and a hobby knife to clean up mold lines.
- Epoxy putty like Green Stuff or Milliput for filling gaps and sculpting. You can also make what’s called Sprue Goo by melting down old plastic sprues in a mostly-finished bottle of plastic cement (Tamiya is my go-to brand) until you have a gray, gloopy paste that’s great for filling gaps in a model.
- Armature wire and Pin Drill for adding stability to your diorama. Drilling holes between two pieces of plastic or metal and inserting a small piece of wire will not only make all the pieces of your diorama stronger, but it will allow you much more flexibility when it comes to repositioning and posing your minis.
The Base
The base is where we’ll create the scene around the models, whether that’s the cramped corridors of a Tyranid-infested space hulk or the decaying streets of Mordheim. Much of this process will be similar to basing models in general, but incorporates elements of terrain-building.
First, pick a size for your base, making sure to leave a good amount of space around your model for the ground, buildings, and detail work. But make sure your base isn’t too bit, or the models (which are still the stars of the show) will end up feeling lost—unless of course you want to create that effect. Personally, I like to leave between 50% and 100% of the model’s height between the outermost model and the edge of the base.
Basing your models can be done with any number of materials, which you’ll want to then build upon with layers that add texture. Classic basing material options include:
- Cork, which creates a natural, jagged effect when broken
- Styrofoam, which should be sealed with a resin
- XPS Modeling foam, which is stupidly expensive, so I would use EVA foam (yoga mats, for example) instead
- Cardboard or plasticard
- Air Dry Clay
- Aquarium gravel, sand, and very small rocks.
3D Printing—Models, Bits, Terrain, etc.
Whether you need an alternate head for your Space Wolf Captain or, like, fifty million skulls for your recreation of the killer bunny from Monty Python’s Holy Grail, access to a 3D printer can really elevate your modeling game.
Loads of sites like Cults, MyMiniFactory, and Thingiverse have tons of stl designs available cheaply or for free by amazing creators, whether you need something elaborate or incredibly simple.
What Next?
Whether you’re comfortable making your own dioramas and want to show your creations off to the world, or are just looking for some inspiration, you may want to check out the annual Golden Demon painting competition.
Hosted by Games Workshop, Golden Demon is a mini-painting Mecca for the world’s most talented mini painters, and has a “Diorama or Duel” category, which is truly amazing and well worth checking out.
Until next time, happy painting.